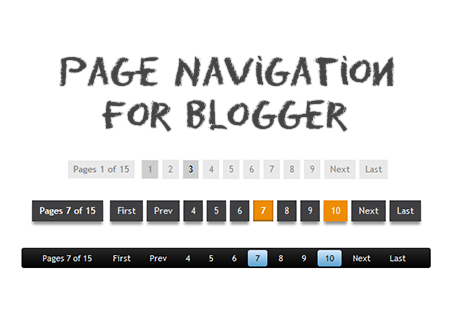
You will see how to add page number navigation blogger. The default navigation links (i.e Older Posts) is not the friendly visitor if you are having a lot of jobs and bloggers readers.Few has some problems with the above script navigation page. It is a must have for any new blogs.This new script allows you to add numbered page navigation to blogger/ blogspot blog with page numbers starting(1, 2, 3, 4 ….) like those of a book.
Page navigation widget for blogger is most popular widget, and most bloggers are using this. because these players are only provided in the wordpress blogs hosted or blogs.But now his trick has been made available to bloggers is also here this Page Navigation Widget with different styles and options for full customization.
How To:
- Go to: Blogger Dashboard > Template > Click Edit HTML Button
- Press the CTRL + F keys find search box
- Copy the code just below it. Just above ]]></b:skin> paste the code of the style that you want.
Step 1: Add Style CSS
Style 1:
#blog-pager{clear:both;margin:30px auto;text-align:center; padding: 7px;}
.blog-pager {background: none;}
.displaypageNum a,.showpage a,.pagecurrent{padding: 3px 7px;margin-right:5px;background:#E9E9E9;color: #888;border:1px solid #E9E9E9;}
.displaypageNum a:hover,.showpage a:hover,.pagecurrent{background:#CECECE;text-decoration:none;color: #000;}
.showpageOf{display:none!important}
#blog-pager .showpage, #blog-pager .pagecurrent{font-weight:bold;color: #888;}
#blog-pager .pages{border:none;}
==========Download Code Here ===========
Style 2:
#blog-pager{clear:both;margin:30px auto;text-align:center; padding: 7px;}
.blog-pager {background: none;}
.displaypageNum a,.showpage a,.pagecurrent{font-size: 14px;padding: 5px 12px;margin-right:5px; color: #666; background-color:#eee;}
.displaypageNum a:hover,.showpage a:hover, .pagecurrent{background:#359BED;text-decoration:none;color: #fff;}
#blog-pager .pagecurrent{font-weight:bold;color: #fff;background:#359BED;}
.showpageOf{display:none!important}
#blog-pager .pages{border:none;}
==========Download Code Here ===========
Style 3:
#blog-pager{clear:both;margin:30px auto;text-align:center; padding: 7px; }
.blog-pager {background: none;}
.displaypageNum a,.showpage a,.pagecurrent{font-size: 13px;padding: 5px 12px;margin-right:5px; color: #3E5801; background-color:#E0EDC1;}
.displaypageNum a:hover,.showpage a:hover, .pagecurrent{background:#FEF6DF;text-decoration:none;color: #E16800;}
#blog-pager .pagecurrent{font-weight:bold;color: #D25E71;background:#FFDEDF;}
.showpageOf{display:none!important}
#blog-pager .pages{border:none;}
==========Download Code Here ===========
Style 4:
#blog-pager{clear:both;margin:30px auto;text-align:center; padding: 7px;}
.blog-pager {background: none;}
.displaypageNum a,.showpage a,.pagecurrent{padding: 5px 10px;margin-right:5px; color: #F4F4F4; background-color:#404042;-webkit-box-shadow: 0px 5px 3px -1px rgba(50, 50, 50, 0.53);-moz-box-shadow:0px 5px 3px -1px rgba(50, 50, 50, 0.53);box-shadow: 0px 5px 3px -1px rgba(50, 50, 50, 0.53);}
.displaypageNum a:hover,.showpage a:hover, .pagecurrent{background:#EC8D04;text-decoration:none;color: #fff;}
#blog-pager .showpage, #blog-pager, .pagecurrent{font-weight:bold;color: #000;}
.showpageOf{display:none!important}
#blog-pager .pages{border:none;-webkit-box-shadow: 0px 5px 3px -1px rgba(50, 50, 50, 0.53);-moz-box-shadow:0px 5px 3px -1px rgba(50, 50, 50, 0.53);box-shadow: 0px 5px 3px -1px rgba(50, 50, 50, 0.53);}
==========Download Code Here ===========
Step 2: Add Script
- Now press CTRL + F > Find </body>
- Copy code paste above</body>
<b:if cond='data:blog.pageType != "item"'>How to configure default page number navigation settings
<b:if cond='data:blog.pageType != "static_page"'>
<script type='text/javascript'>
/*<![CDATA[*/
var perPage=7;
var numPages=6;
var firstText ='First';
var lastText ='Last';
var prevText ='« Previous';
var nextText ='Next »';
var urlactivepage=location.href;
var home_page="/";
/*]]>*/
</script>
<script src="http://helplogger.googlecode.com/svn/trunk/page-navigation2.js"/>
</b:if>
</b:if>
When you have finished adding the CSS code and the script, you might want to change my default settings as per your requirements. So, in order to change the default settings, just follow the steps.
 perPage: 7,
 numPages: 6,
 var firstText ='First';
 var lastText ='Last';
 var prevText ='« Previous';
 var nextText ='Next »';
 }
a. perPage
This will show how many posts will be shown on each page of your blog (7 by default).
b. numPages
This will show how many pages will be shown in the page navigation (6 by default).
c. var firstText, var lastText, var prevText and var nextText
These just the words that will show up to your visitors for navigation. So, you can type your own within the codes. (First, Last, Previous and Next).
Fixing the Labels
Blogger will show up 20 of your blog post on the label pages by default but you can also make this widget appear on label pages by just cutting down the value in perPage variable.
Find each occurrence of the following code snippet:
1: expr:href='data:label.url'
Replace it with the below code.
expr:href='data:label.url + "?&max-results=7"'
Here 7 is the number of your blog posts that will appear on per page.
Lastly, click on Save Template.
You are done. Now, view your blog and happy blogging.


Post a Comment